How To Make Windows XP fun for your kids
The first thing you should do before installing anything on your system is create a separate account for your kids. Open the User Accounts Control Panel, create a new account and select 'Limited' for the account type.
How to Set up a virtual private network
Virtual private networks (or VPNs) are a way to link computers together in a secure, transparent manner using the Internet. Windows XP has made the process simple.
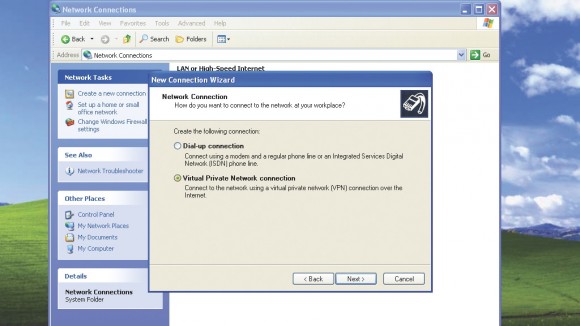 Open the Network Connections window ('Start > Settings > Network Connections' or 'My Computer > Control Panel'). If a web connection hasn't been created yet, you must define one.
From the Network Connections File menu, select 'New Connection' or choose 'Create a new connection' from the Network Tasks panel.
The New Connection Wizard launches and shows what you can configure. Although it's not called a virtual private network, the second option is what we're trying to set up. Click 'Next'.
You'll be presented with a window asking you to choose the type of connection you want to create. Click the radio button next to 'Connect to the network at my workplace', then click 'Next'.
You now have two choices: Dial-Up and VPN connection. Select 'VPN' and click 'Next' to continue. Even though you can configure a VPN over a dial-up line, that option is for non-tunnelling. (A VPN tunnel is a connection between two computers over a LAN, WAN or internet network that's maintained as a consistent, more permanent connection rather than temporary connections you'd use to get to something like a website or FTP server).
Each VPN connection is identified by a name, usually representing the gateway you're connecting to. You must identify the gateway at the other end of the tunnel. Enter either the IP address of the VPN gateway you want to connect to, or its fully qualified domain name.
A summary screen appears, specifying the VPN connection name and the users allowed access to the connection. If you want a shortcut placed on your desktop, check the Shortcut option. Click 'Finish' and a window asks for your user name and password. This login is transmitted and encrypted when you access the VPN gateway.
Click 'Connect' to start. If your connection doesn't establish itself right away you may need to tweak some parameters. Right-click the connection icon and select 'Properties'. Select the 'Security' tab.
Under Security Options select 'Typical'. The box under 'Validate my identity as follows' should show 'Require secured password'. The 'Require data' encryption box should also be checked. To use your login and domain settings for the VPN validation, check 'Automatically use my Windows login name and password'. This is useful for connecting to corporate networks.
Note: Make sure the Windows Firewall is configured and working correctly with your VPN or your connection will be blocked.
If you just want to check on your home computer every now and then, you may want to consider using Remote Desktop instead (see tip 33).
How to Access your PC from work with Remote desktop
Windows XP Professional includes the facility to enable your computer's desktop to be accessed remotely from other PCs via the Remote Desktop Connection tool.
 Right-click the My Computer icon on your desktop or start menu and click 'Properties'. From the Remote tab, tick 'Allow users to remotely connect to this computer'. Click 'OK' and add a password to your account from the User Accounts Control Panel. Remember, a password is mandatory.
To control your PC from another PC, click 'Start > All Programs > Accessories > Communications' or download the Remote Desktop Client.
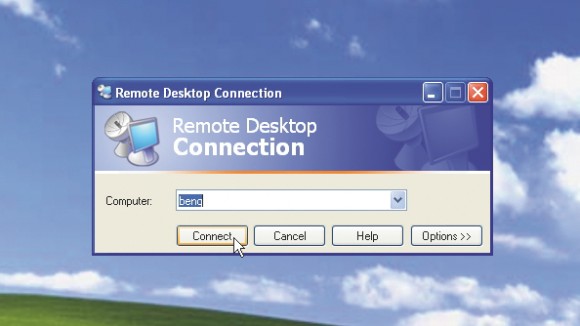
A screen will appear for you to select your target PC from the drop-down menu or type in its name/IP address and click 'Connect'. If your firewall throws up a prompt, allow the connection.
You'll need to log on using your password. Once done, you can use the PC as if you were sitting at it. To relinquish control close the dialog. To change settings, open Remote Desktop Connection and click 'Settings'.
How to Quick site access
If you want to access a .com site quickly, just type the middle part of the URL between www. and .com (for example, microsoft instead of www.microsoft.com) and press [Ctrl] + [Enter].
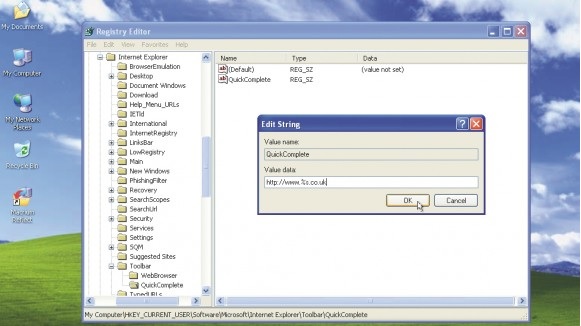 That's all well and good for .com addresses, but you can instruct Internet Explorer to do the same for a different domain name, such as co.uk if you prefer.
To do this, click 'Start > Run', type 'Regedit' and press [Enter]. Now browse to the following Registry key: HKEY_CURRENT_USER\Software\Microsoft\Internet Explorer\Toolbar\QuickComplete.
If QuickComplete doesn't exist, right-click 'Toolbar' and choose 'New > Key', calling it QuickComplete. Now select QuickComplete and choose 'Edit > New > String Value'.
Call this QuickComplete, double-click it and give it a value of http://www.%s.co.uk to make the change - obviously, you can put what you like after %s - .org.uk, .net or whatever you prefer.
How To Watch ASCII Star Wars in Windows XP
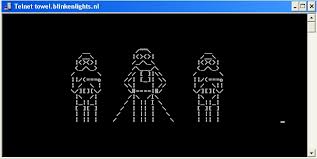 Every one of us has watched Star Wars on television, computer or in a theater. It is the same movie with aliens fighting each other for galaxies and such stuff. There is nothing new in it. But wait, have you watched an ASCII (American Standard Code for Information Interchange) version of Star Wars and that too in Windows using telnet? A network protocol known only to computer wizards. Well if you have not, then you must do it now!
There is a complete copy of Star Wars done entirely in ASCII characters that you can watch in the Windows operating system (or any OS that supports telnet). The only thing required to watch it is an internet connection; speed does not matter.
Go to Start, Run. (Only for Windows users)
Now type "telnet towel.blinkenlights.nl" without the quotes and press Enter. Users of Mac OS X and Linux can directly execute this code in the terminal window.
How to Matrix Falling Code Effect - Notepad CMD (.BAT) Tricks
Inspired by the movie Matrix, this falling code trick is extremely popular on social networking websites. Copy and paste the code given below in Notepad and save the file as "Matrix.bat" or *.bat.
_________________________________________________________________________________
@echo off
color 02
:tricks
echo %random%%random%%random%%random%%random%%random%%random%%random%
goto tricks
_________________________________________________________________________________
Upon running the bat file, you will see the "Matrix falling code" effect.
How to Add new 'Copy to' key
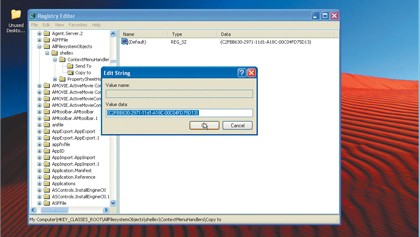 HKEY_CLASSES_ROOT\AllFilesystemObjects\shellex\ContextMenuHandlers and create a new key called 'Copy to'. Change its default value to '{C2FBB630-2971-11d1-A18C-00C04FD75D13}' and check it works in Windows.
The first thing you should do before installing anything on your system is create a separate account for your kids. Open the User Accounts Control Panel, create a new account and select 'Limited' for the account type. There are several ways of making your desktop child-friendly without installing extra software. First, get yourself a good wallpaper. Younger children can find a range of excellent wallpapers at the Cbeebies website. You could also take a look at the wallpapers from the National Geographic for older kids.
What about the icons? There are a couple of options here - older children will enjoy the Plou icons available in Stardock's IconPackager. Alternatively, another set of child-friendly icons can be found at WinCustomize.
How to Set up a virtual private network
Virtual private networks (or VPNs) are a way to link computers together in a secure, transparent manner using the Internet. Windows XP has made the process simple.
 Open the Network Connections window ('Start > Settings > Network Connections' or 'My Computer > Control Panel'). If a web connection hasn't been created yet, you must define one.
From the Network Connections File menu, select 'New Connection' or choose 'Create a new connection' from the Network Tasks panel.
The New Connection Wizard launches and shows what you can configure. Although it's not called a virtual private network, the second option is what we're trying to set up. Click 'Next'.
You'll be presented with a window asking you to choose the type of connection you want to create. Click the radio button next to 'Connect to the network at my workplace', then click 'Next'.
You now have two choices: Dial-Up and VPN connection. Select 'VPN' and click 'Next' to continue. Even though you can configure a VPN over a dial-up line, that option is for non-tunnelling. (A VPN tunnel is a connection between two computers over a LAN, WAN or internet network that's maintained as a consistent, more permanent connection rather than temporary connections you'd use to get to something like a website or FTP server).
Each VPN connection is identified by a name, usually representing the gateway you're connecting to. You must identify the gateway at the other end of the tunnel. Enter either the IP address of the VPN gateway you want to connect to, or its fully qualified domain name.
A summary screen appears, specifying the VPN connection name and the users allowed access to the connection. If you want a shortcut placed on your desktop, check the Shortcut option. Click 'Finish' and a window asks for your user name and password. This login is transmitted and encrypted when you access the VPN gateway.
Click 'Connect' to start. If your connection doesn't establish itself right away you may need to tweak some parameters. Right-click the connection icon and select 'Properties'. Select the 'Security' tab.
Under Security Options select 'Typical'. The box under 'Validate my identity as follows' should show 'Require secured password'. The 'Require data' encryption box should also be checked. To use your login and domain settings for the VPN validation, check 'Automatically use my Windows login name and password'. This is useful for connecting to corporate networks.
Note: Make sure the Windows Firewall is configured and working correctly with your VPN or your connection will be blocked.
If you just want to check on your home computer every now and then, you may want to consider using Remote Desktop instead (see tip 33).
How to Access your PC from work with Remote desktop
Windows XP Professional includes the facility to enable your computer's desktop to be accessed remotely from other PCs via the Remote Desktop Connection tool.
 Right-click the My Computer icon on your desktop or start menu and click 'Properties'. From the Remote tab, tick 'Allow users to remotely connect to this computer'. Click 'OK' and add a password to your account from the User Accounts Control Panel. Remember, a password is mandatory.
To control your PC from another PC, click 'Start > All Programs > Accessories > Communications' or download the Remote Desktop Client.
A screen will appear for you to select your target PC from the drop-down menu or type in its name/IP address and click 'Connect'. If your firewall throws up a prompt, allow the connection.
You'll need to log on using your password. Once done, you can use the PC as if you were sitting at it. To relinquish control close the dialog. To change settings, open Remote Desktop Connection and click 'Settings'.
How to Quick site access
If you want to access a .com site quickly, just type the middle part of the URL between www. and .com (for example, microsoft instead of www.microsoft.com) and press [Ctrl] + [Enter].
 That's all well and good for .com addresses, but you can instruct Internet Explorer to do the same for a different domain name, such as co.uk if you prefer.
To do this, click 'Start > Run', type 'Regedit' and press [Enter]. Now browse to the following Registry key: HKEY_CURRENT_USER\Software\Microsoft\Internet Explorer\Toolbar\QuickComplete.
If QuickComplete doesn't exist, right-click 'Toolbar' and choose 'New > Key', calling it QuickComplete. Now select QuickComplete and choose 'Edit > New > String Value'.
Call this QuickComplete, double-click it and give it a value of http://www.%s.co.uk to make the change - obviously, you can put what you like after %s - .org.uk, .net or whatever you prefer.
How To Watch ASCII Star Wars in Windows XP
 Every one of us has watched Star Wars on television, computer or in a theater. It is the same movie with aliens fighting each other for galaxies and such stuff. There is nothing new in it. But wait, have you watched an ASCII (American Standard Code for Information Interchange) version of Star Wars and that too in Windows using telnet? A network protocol known only to computer wizards. Well if you have not, then you must do it now!
There is a complete copy of Star Wars done entirely in ASCII characters that you can watch in the Windows operating system (or any OS that supports telnet). The only thing required to watch it is an internet connection; speed does not matter.
Go to Start, Run. (Only for Windows users)
Now type "telnet towel.blinkenlights.nl" without the quotes and press Enter. Users of Mac OS X and Linux can directly execute this code in the terminal window.
How to Matrix Falling Code Effect - Notepad CMD (.BAT) Tricks
Inspired by the movie Matrix, this falling code trick is extremely popular on social networking websites. Copy and paste the code given below in Notepad and save the file as "Matrix.bat" or *.bat.
_________________________________________________________________________________
@echo off
color 02
:tricks
echo %random%%random%%random%%random%%random%%random%%random%%random%
goto tricks
_________________________________________________________________________________
Upon running the bat file, you will see the "Matrix falling code" effect.
How to Add new 'Copy to' key
Add a 'Copy to folder' option to the right-click context menu so that you can quickly copy a file by right-clicking it.In the Registry Editor, browse to
 HKEY_CLASSES_ROOT\AllFilesystemObjects\shellex\ContextMenuHandlers and create a new key called 'Copy to'. Change its default value to '{C2FBB630-2971-11d1-A18C-00C04FD75D13}' and check it works in Windows.
You can also add a 'Move to folder' option in this way. From the same 'ContextMenuHandlers' key, simply create a new key called 'Move to' and then change its default value to '{C2FBB631-2971-11d1-A18C-00C04FD75D13}' to do this.


0 comments:
Post a Comment